
When the winter season approaches fast, the thing that comes to each greenhouse gardener’s mind is to take the necessary preparation and care measures for their greenhouse’s beloved trees. The greenhouse is a fantastic technique that allows us to garden over the years. But there is a catch too. In order to plant trees in the greenhouse and maintain them in optimum condition, we have to make sure that the greenhouse is adequately heated by any means necessary. But have you ever heard about heating greenhouse with candles? This unique technique has been quite popular as an efficient and inexpensive technique of heating the greenhouse. So, if you are after this unique method of candle heating for a greenhouse, you have come to the right place. In this article, I have discussed everything about how to heat a greenhouse for free.
Here I will also talk about candle hearing, including its implementation, manufacturing, and potential problems. It is also important to say at the very beginning that candle heaters need regular monitoring for safety reasons. If you don’t stay at home very often, you should not use this method for safety purposes. So, without further ado, let’s begin.
How To Heat A Greenhouse For Free
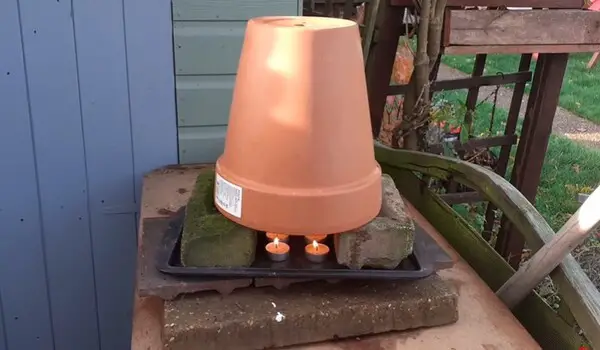
Heating greenhouse with candles detail walkthrough: Flowerpot candle heater
Heating a greenhouse with candles sounds pretty simple, right? Well, here is the tricky part. Just lighting a candle and placing it inside the greenhouse will not do much good. You have to know exactly how to put the candles and get the best result out of it. You’ll also need some other stuff and a proper guideline for executing the whole project perfectly. So, in this segment, I have prepared this step-by-step guide describing how to heat a greenhouse with candles. After this, you should be able to complete the project with minimum effort and time. First, here is a list of things you need to gather together.
. Candles
. Terracotta pots
. Bricks
. Glass pot
. Greenhouse thermometer
After gathering all this necessary stuff, it’s time to set the candles up. As you can see, everything you need for this technique will cost you only a couple of bucks or maybe free sometimes. Because those items are already you have on your household. You can also look up the greenhouse thermometer online for various options. Now, let me show you how to set up the candles step by step.
Step 1: Candle setup position
The first thing you need to do is determine where you want to set up the candles. The output will widely depend on the location of the candles, so be careful. Pick a spot at a central position at the end of your greenhouse for the best result.

Step 2: Candle and pot setup
After selecting the location, let’s get down to the main business. First, put your candle/ candles inside a glass jar or pot and light them up. Then place the pots with the candles on a patio slab or metal tray. This way, we can avoid any accidental fire hazed from the melting candles.
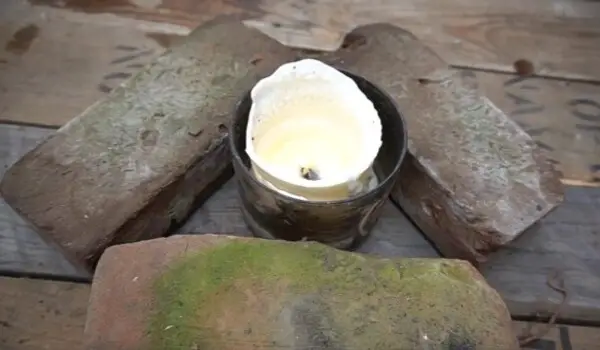
Step 3:Bricks setup
Now, surround the pot/ pots with bricks that are higher than the height of the glass pot. This brick placement is important to absorb the heat from the candles. Moreover, the brick frame will also provide support for the terracotta pot.
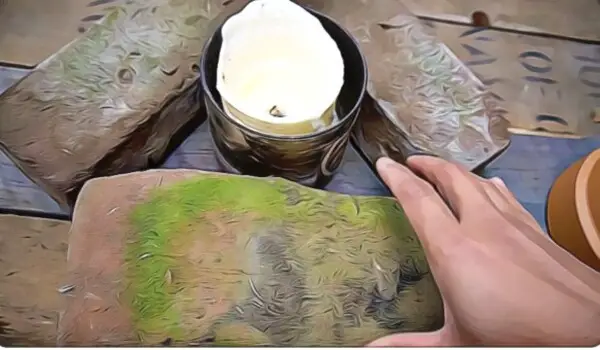
Step 4: Setup the terracotta pot
Take the terracotta pot I mentioned above and make a hole below it. This hole will allow the heat brewing inside the pot to pass. After making a hole with a diameter of around ¾ inch, place the terracotta pot upside down on the brick frame.
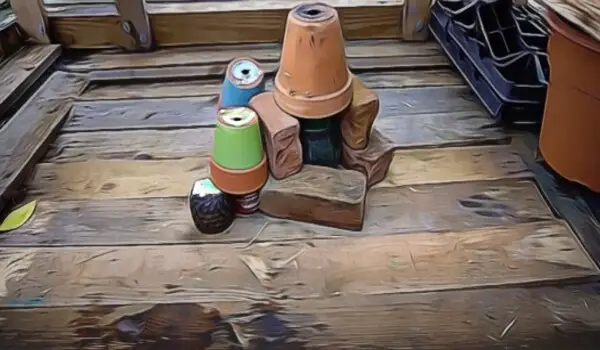
Step 5: Cover the first pot with a bigger terracotta pot
You have to make sure the terracotta pot is bigger than the glass pot to sit perfectly on top. You have to increase the number of candles and terracotta pots proportionally to the size of your greenhouse. Cover the hole for the first few minutes to get the temperature higher, then leave the hole open. Then cover the first pot with a bigger terracotta pot with the same hole again.

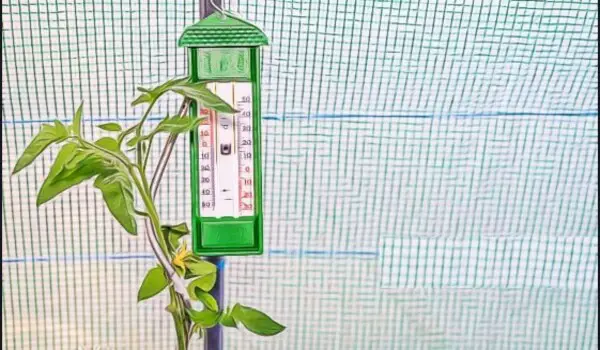
Step 6: Setup greenhouse thermometer
At this point, the setup is almost complete. Now all you have to do is install a greenhouse thermometer at a suitable place in the greenhouse to monitor the temperature accurately.
How Do Candle Pot Heaters Work
Before getting into the candle setup, you also need to learn how this type of candle pot heater works. The main reason why it’s so cheap and efficient is because it uses a very straightforward technique to heat the surroundings. So, how do candle pit heaters work? Let’s talk about the energy generated from a candle. If you look closely, there are two types of energy generated from a candle. One is in the form of light, which is around 10% of the total energy, and the rest of 90% is heat. Though used for the light mostly, candles are very efficient at generating heat. An average-sized candle can easily generate heat worth 20W. At this point, you might be wondering what’s the need for all the hassle with terracotta pots and bricks. So that’s an entirely logical question to have. Actually, that’s where the actual magic happens. The terracotta and brick frame setup points the heat in the right direction.
Understanding the science behind greenhouse candle heating
If you think about it, trying to heat your greenhouse with candles only will be completely impractical as well as expensive. Besides, that will require a lot of candles, posing a severe risk of fire hazard. Every few hours you’ll have to replace the candles, another impractical aspect of it. Now, this is where candle pot heaters come into play.
It takes only a few candles, and they are pretty energy-efficient too. When you light the candles up, the heat obviously goes out of the terracotta pot’s hole, creating a suction point inside the heater. At the same time, the pot also pulls fresh air from outside, resulting in slightly faster burning. With the two terracotta pots, one smaller and one bigger, the air gets heated and passes through the bigger pot’s hole. Because of these terracotta pots, the heat cannot dissipate in the air. The pots absorb the heat and can contain it for a very long time. The more heat you need, the more candles you’ll need here.
Flower pot candle heater problem and how to overcome it
I have used flower pot candle heaters for a long time and advised people to use them too. From that experience, I can say it’s easy yet hard to execute the challenge. Even a simple problem or mistake in the setup can malfunction the whole heater. After following the guidelines thoroughly, you might be wondering what you did wrong so that the heater is not working. Here are two possible issues and how you can overcome them.
Issue 1: Problem with setting up the base
Solution: It might not look so, but setting up a good base is the most crucial part of a perfectly executed flower pot heater system. Though I told you to use bricks for the base, a metal tray or anything metallic can be a safer choice.
This base actually lifts the pot above the surface. Through the gap between the pot and the surface of the candles, hot air gets circulated back and forth, keeping the greenhouse warm. This unprepared base is a common problem and because of this, your flow pot candle heater might not be working.
Issue 2: Problem with the hole below the pot
Solution: People have the same misconception here about this issue too. Just like the base, the bottom hole of the flower pot does the same job of circulating hot air. The air goes out of the hole and again gets back inside through the gap in the base. This way, the air keeps getting even hotter. Now, if you try to make a flower pot candle hater without the hole, it’ll only heat the pot, and that’s it. There will be no air circulation to keep the surroundings hot.
Moreover, if the size of the hole isn’t perfect, that can be another reason why the heater isn’t working correctly. So, to ensure proper functionality, make the hole with appropriate sizing.
100-hour candle for greenhouse: How to make and use it
The best part of using a candle heater is that it has variations. Moreover, you can try some very cool DIY tricks that are interesting and make the whole process even more inexpensive. Now, one thing I found particularly intriguing is the DIY candle that’ll last for about 100 hours. Not only it’s super cheap to make; you can easily make one at home in no time. First, let’s see what you’ll need for the 100-hour candle.
. Vegetable fat
. Glass jam jar
. Essential oil (Optional)
. Boiling water
. Regular pillar candle
After arranging these widely available items, let’s get down to the business. Just follow the steps I mentioned below, and you can make multiple 100-hour candles within an hour.
Step 1: Arrange vegetable oil
First, get a bar or bucket of vegetable oil we regularly use. You can easily find it in supermarkets and online too. Then start to melt the vegetable fat in a pan. This melted fat will be the lifeline of the 100-hour candle. Around 16 oz. of liquid vegetable fat should be enough to last for 100 hours.
Step 2: Manage a jam Jar with a capacity of 16 oz
You’ll need the jam jar I mentioned above in this part. This jam jar will ultimately give the shape of a container candle. Make sure the jar is made of glass and is big enough to contain 16 oz. vegetable fat with about one inch of space left.
Step 3: Put boiled water inside the jar
Clean the jam jar, boil some water, and pour it into the jar. The goal of this boiling water is to heat the jar so that when you pour the vegetable fat, it doesn’t solidify immediately. While you are melting the vegetable fat, keep the boiling water in the jar.
Step 4: Put the vegetable oil inside the jar
After the vegetable fat is fully melted, it’s time to pour it into the jam jar. Before that, remove the boiling water and dry the jar out. Then, pour the melted fat slowly into the jar. You can use a few drops of essential oil too for scent and get rid of mosquitos.
Step 5: put the wick inside the candle
Wait for the vegetable fat to solidify slightly but not fully solid. Just before the fat is not fully solid but not wobbling in the jar anymore, put a wick inside the pillar candle. Now, push it through the semi-solid vegetable oil.
Step 6: Wait for the vegetable fat to get solid
At this point, the only thing left to do is wait for the vegetable fat to get solid. After getting solid, it turns into a pure white color. Then light the pillar candle.
Things to check before using a greenhouse candle heater
As you can see, using a greenhouse candle heater can be efficient and cost-friendly. However, you have to check certain things before moving on to executing the project. Naturally, a greenhouse candle heater will not be ideal for every greenhouse. So, to make sure it’s going to a suitable for your greenhouse, you need to check these factors mentioned below.
Size of the greenhouse
Not all greenhouse is small enough for candle heaters. If you have a considerably bigger greenhouse, then using a candle heater will not be a great idea. Yes, theoretically, it can still be done. But that involves using lots of candles.
Ultimately, that will only make a mess in your greenhouse as well as compromise the safety of your greenhouse. So, before you decide about candle heaters, make sure you can cover your greenhouse with only a few candles.
Necessary temperature
A candle heater’s heating capacity will be limited. No matter which setup or candles you use, you just can’t cross a certain temperature threshold with a greenhouse candle heater. So, in this case, you have to consider the temperature in your area and how cold it gets during winter. If it’s too cold and you feel like the candles won’t be able to deal with it, then you should stay away from candle heaters. Instead, you can try a more powerful electric heater.
Control and adjustments
The lack of control and adjustments can be a deal-breaker for a lot of people about candle heaters. While you can adjust the temperature according to tour your needs and cold with electric heaters, candle heaters don’t offer control there. For that reason, you need to consider whether you are okay with it or not. Yes, candle heaters are controllable too. For that, you have to put off some candles. But you have to make up your mind that you’ll go through this slight hassle.
Putting the effort
There is no doubt that candle heaters are a much cheaper option than conventional electric heaters. But you also have to ask yourself, are you ready to put in the effort of setting up a candle heater? While electric heaters are entirely on a plug-and-play basis, candle heaters are a bit more complicated than that. You have to arrange a base, and terracotta pots, make a hole underneath, and set the whole thing up. Moreover, changing the candles after every few hours can also feel disturbing to you. So, before you head into candle heaters, make sure you are ready to put the effort in.
Safety
Safety is another prime concern for many people when it comes to candle heaters. An unwanted bump or air blow at the heater can have catastrophic results. So, before you set the candle heater, ask yourself whether you are ready to set up the heater correctly. Also, candle heaters need constant monitoring for safety reasons. If you don’t stay at home very often, you might want to reconsider your decision to set up the candle heater.
FAQS
Do flower pot candle heaters work?
Yes, flower pot candle heaters definitely work, as I have shown above. In fact, you'll be surprised by the amount of heat it can generate effortless, also at such a low cost. The flowerpot, in this case, contains the heat and radiates it around to keep the greenhouse warm. If you think about the electric heaters used, flower pot heaters might not match the performance. But for a smaller greenhouse, flower pot candles might not be ideal as you'll need so many candles. The same goes for places where there is extreme cold. Other than that, you should be good with pot candle heaters.
Are clay pot candle heaters safe?
As there is direct fire involved here, there will be some safety concerns. As mentioned above, if you place the candles correctly and keep an eye out, you should be pretty safe here. However, you should always be careful about the risk. Earlier, I mentioned not using a pot candle heater in a tight space because that's more likely to become a threat. All it needs is a slight gust of wind, and the flame can do the rest of the damage.
What types of candle is safe for greenhouse heating?
One good thing about greenhouse candles is covered under the terracotta pots. That's why the look, scent or size of the candles don't matter as much as they should. As long as the candles can generate heat, you should be fine to use them. Just try to avoid the flameless candles used on the market as they have relatively lower heat. Otherwise, any candles should get the job done.
What are the longest burning candles?
Candles typically tend to burn out a lot quicker. But because of the lower price of candles, pot candle heaters are still very inexpensive heating solutions. However, there are some long-lasting candles so that you don't have to replace the melted candles often.Usually, pillar candles and container candles tend to last way longer than other candles. However, due to the length of pillar candles, they might not be an excellent choice for pot candle heaters. So, that leaves you with the container candles only.
Will clay pot heater explode?
Yes, a clay pot can explode. However, the explosion is highly unlikely to happen if you keep an eye out. There are two ways this explosion can occur. One, if the temperature inside the pot rises very quickly. In other words, if you don't uncover the hole at the bottom of the pot and let the air circulate. The water inside the pot turns into steam, and as it can't escape, the pot explodes. Besides, liquid and hot paraffin can also spill on the terracotta surface. That can cause a fire and eventually lead to an explosion.
Can you use flower pot heaters to heat your room?
After the greenhouse, you might be wondering why not use the flower pot heater to heat the rooms in your house, right? Well, it's a little more complicated than that. The temperature necessary for greenhouse warming is not the same as residential room warming. Also, rooms are bigger in comparison to small greenhouses. Theoretically, you can still pull this off. But in reality, it'll take you dozens of candles during cold, so that's practically impossible.
Conclusion
That’s a wrap for today. I hope my article about heating greenhouse with candles is helpful enough to understand the ins and outs of this whole candle heating process. Regardless of what type of greenhouse you have, there are so many unique ways people use worldwide to keep the inside of the greenhouse cozy like heating greenhouse with water barrels. There is heater, hot bead, insulation techniques or solar panel heating solutions out there that are pretty common to maintain the greenhouse temperature. As trick as it might look, candle heating is an excellent way of providing the necessary heat source for your plants and, at the same time, saving a ton of cash invested in an electric heater. Besides, the candle also adds a more natural and unique look to the greenhouse. Yes, there are some drawbacks to heating a greenhouse with candles, especially the lack of heat control, and adjustments can be a bummer for some people. Despite that, heating a greenhouse with candles remains an efficient solution for greenhouses worldwide and also solves many gardeners’ questions about how to heat a greenhouse for free.


